Back to Product Page
|
MAST
TYPE JIB CRANES
|
|
MT400
AND MT450 - 1/4 TON CAPACITY
|
|
 |
|
|
|
CHART
1B - Boom Data |
|
|
| STANDARD
BOOM DATA |
Boom
Height (W) |
Beam Size |
Flange
Width (in) |
|
6" |
W6@12#/ft. |
4" |
|
8.125" |
W8@18#/ft. |
5-1/4" |
|
10.33" |
W10@26#/ft. |
5-3/4" |
|
12.5" |
W12@35#/ft. |
6-1/2" |
|
16.125" |
W16@45#/ft. |
7" |
|
18" |
W18@50#/ft. |
7-1/2" |
|
21" |
W21@62#/ft. |
8-1/4" |
|
24.125" |
W24@84#/ft. |
9" |
|
| Note:
For E and W dimensions, reference your crane's model number. |
|
|
PIVOT NO. |
D |
H |
J |
K |
L |
M |
|
15 |
2-3/4" |
13/16" |
7" |
9" |
10" |
12" |
|
20 |
3-1/4" |
13/16" |
7" |
10" |
10" |
13" |
|
25 |
3-3/4" |
13/16" |
9" |
12" |
12" |
15" |
|
|
|
|
|
|
 |
|
Order
Online, by Phone, or by E-Mail |
|
|
|
~
Add items to your online shopping cart ~
Click the Model No. of the item
you wish to purchase.
|
|
|
|
1/4
Ton Capacity - PRICING - MT400 & *MT450
|
Dim.
"C" |
SPAN |
8' |
10' |
12' |
14' |
16' |
18' |
20' |
|
10' |
Model |
W8-W6-15 |
W8-W6-15 |
W8-W6-15 |
W8-W8-15 |
W8-W8-15 |
W10-W8-15 |
W10-W8-15 |
|
Weight |
430 |
465 |
525 |
600 |
635 |
865 |
920 |
|
Price |
$3,456
|
$3,522
|
$3,613
|
$3,778
|
$3,919
|
$4,610
|
$4,721
|
|
12' |
Model |
|
|
|
|
|
|
|
|
Weight |
475
|
500
|
560
|
630
|
670
|
910
|
960
|
|
Price |
$3,522
|
$3,581
|
$3,712
|
$3,895
|
$3,966
|
$4,689
|
$4,799
|
|
14' |
Model |
|
|
|
|
|
|
|
|
Weight |
510
|
535
|
590
|
665
|
790
|
960
|
1000
|
|
Price |
$3,576
|
$3,658
|
$3,818
|
$3,938
|
$4,439
|
$4,772
|
$4,886
|
|
16' |
Model |
|
|
|
|
|
|
|
|
Weight |
545
|
570
|
625
|
700
|
830
|
995
|
1045
|
|
Price |
$3,648
|
$3,710
|
$3,850
|
$4,011
|
$4,497
|
$4,837
|
$4,925
|
|
18' |
Model |
|
|
|
|
|
|
|
|
Weight |
575
|
600
|
660
|
740
|
870
|
1035
|
1085
|
|
Price |
$3,696
|
$3,782
|
$3,912
|
$4,058
|
$4,532
|
$4,886
|
$5,057
|
|
20' |
Model |
|
|
|
|
|
|
|
|
Weight |
610
|
635
|
695
|
880
|
915
|
1075
|
1340
|
|
Price |
$3,770
|
$3,829
|
$3,969
|
$4,574
|
$4,652
|
$5,013
|
$5,757
|
|
| *MT450
DROP CANTILEVER $783.00
LIST ADDER |
| Model
Explanation: use MT400 for a full cantilever jib or MT450
for the drop cantilever and then add the model number. |
| Example:
2 ton, 10' span, 20' overall height=MT400-W18-S12-15. The 18=E;
12=W; 15=pivot pin diameter. |
|
|
|
 |
|
Order
Online, by Phone, or by E-Mail |
|
|
|
~
Add items to your online shopping cart ~
Click the Price of the item
you wish to purchase.
|
|
|
|
|
ACCESSORIES
|
|
Included
in the base price of all jib cranes: Jib End Stops, Installation
& Maintenance Manual (2), Touch-Up Paint
(1 spray can). |
|
Description |
Approx.
Ship Wt. |
Price |
Mast Type Manual Rotation Stops.One piece
welded to back of safety channel: two pieces
shippedloose for field welding. |
2 |
|
Tagline Assemblies.(if desired without collector).
Includes two trolley stops with tagline
angle,tagline cable, 2 cable clamps, 2 eye bolts, and
5 "S" hooks. Electrical wire is not included
(See "Flatand Round Cable") |
25 |
|
|
Flat and Round Wire- 4 conductor #14 |
.1/ft. |
|
|
Flat and Wire Cord Grip Connectors- for
4 conductor #14 flat wires |
3 |
|
|
Air Hose |
|
a. 3/8" ID |
.1/ft. |
|
|
b. 1/2" ID |
.1/ft. |
|
|
Wire Rope Trolley- (specify for flat or
round wire) |
1 |
|
|
MT450 - Drop Cantilever Connection |
|
|
Please contact our customer service dept. for pricing
on the following options: |
|
a. Special Paint |
|
b. Sandblasting |
|
c. Galvanizing |
|
d. C Track Festooning |
|
e. Any special requirement |
|
|
| STEP
2 - BOOM/MAST ASSEMBLY INSTALLATION |
| TIP:
Upper and lower pivot bearing assemblies are identical. |
|
|
|
|
|
|
|
| 2.1
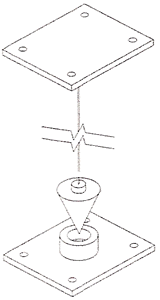
Locate top pivot bearing assembly and bottom pivot bearing |
|
 |
|
assembly
in the desired location (bolts by others). |
|
|
Make
sure the pivot bearing assemblies are in line and plumb |
|
|
through
pivot pin holes in the bearings (diagram 2A). |
|
|
|
|
|
|
|
| 2.2
If using optional rotation stops, execute step A of the rotation |
|
|
stops
section on Rotation Stops before proceeding to next step. |
|
|
|
|
|
|
|
| 2.3
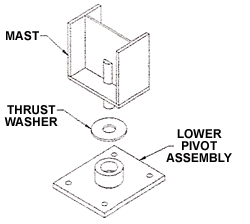
Place the top and bottom pivot assemblies onto the top pivot
pin and |
|
|
bottom
pivot pin of the mast. Be sure the thrust washer is between
the
mast and bottom pivot bearing (diagram 2B). Take the
entire mast
assembly with pivot bearing assemblies and raise them into position.
Bolt the top pivot assembly to the overhead support and the
bottom
pivot assembly to the floor support. One-half inch (1/2”)
clearance
should be allowed between top fitting and overhead support to
ease
installation and for shimming if required. |
|
|
|
|
|
|
|
| 2.4
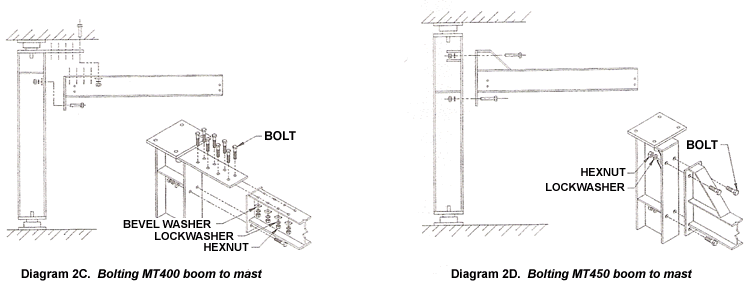
For a MT400: Bolt boom to mast using bolts for the top
of boom |
|
|
Diagram
2A. Plumbing the pivot bearing
assemblies. |
|
and
bolts for mast connection plate using hardware provided
(diagram 2C). |
|
|
|
|
|
For
a MT450: Bolt boom to mast using hardware provided (diagram
2D). |
 |
|
|
|
|
|
|
| 2.5
Level boom to a point of 1/300 of span (in inches) above level.
Shim, if |
|
|
necessary,
between mast and back of boom plate (shims by others).
Make sure that shim has full contact at connection and that
there are
no voids. Torque nuts (chart 2A). |
|
|
|
|
|
|
|
| 2.6
Tighten mounting bolts (grade 5 or better) to manufacturer’s
specifications. |
|
|
|
|
|
|
|
|
|
Bolt Dia. |
Torque |
|
1/2" |
50 ft.-lbs. |
|
5/8" |
95 ft.-lbs. |
|
3/4" |
175 ft.-lbs. |
|
7/8" |
300 ft.-lbs. |
|
1" |
450 ft.-lbs. |
|
|
|
|
|
|
|
|
|
Diagram
2B. Installing pivot assembly on
pivot pin. |
|
|
|
Chart
2A. Torque Ratings |
|
|
|
|
|
|
|
|
 |
|
|
|
|
|
| STEP
3 - ENDSTOP/TAGLINE INSTALLATION |
|
 |
|
|
|
| 3.1
Endstop |
|
|
A)
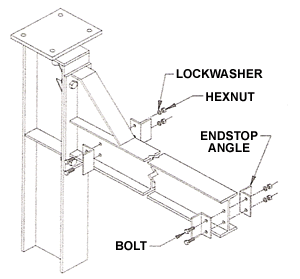
Bolt endstops to end of boom closest to mast (diagram 3A).
B) Roll hoist trolley (by others) into place.
C) Bolt remaining endstops into place at the front of boom
(diagram 3A).
D) Torque nuts (refer to chart 2A, above, for proper torque
rating). |
|
|
|
|
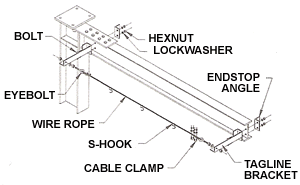
| 3.2
Tagline Assembly |
|
|
A)
Bolt tagline bracket and an endstop to end of boom closest
to mast (diagram 3B).
B) Roll hoist trolley (by others) into place.
C) Bolt remaining tagline bracket and endstop into place at
the
front of the boom (diagram
3B). Torque nuts (refer to chart
2A, above, for proper torque
rating).
D) Bolt eyebolt to the tagline brackets. Be sure the eyes of
the
eyebolts are oriented toward each other. |
|
|
|
Diagram
3A. Endstop installation. |
|
|
|
|
|
 |
|
E)
Run wire rope between eyebolts and clamp to form a loop
at each end. Tighten eyebolts so wire
rope is taught.
F) Add “S” hooks to wire rope and squeeze closed the
top
of the “S” hook.
G) Space “S” hooks evenly along wire rope and place
round
power cable/air hose through bottom
loop of the “S” hooks.
H) Squeeze bottom of “S” hook to grip wire, or tape
wire in
place. Do not squeeze too tightly or
damage may occur to
power cable or air hose. |
|
|
|
Diagram
3B. Tagline assembly installation. |
|
|
|
|
|
|
|
|
|
|
|
|
 |
| STEP
4 - OPTIONAL ACCESSORIES |
|
|
|
|
|
|
|
|
| 4.1
Rotation Stops |
|
|
|
|
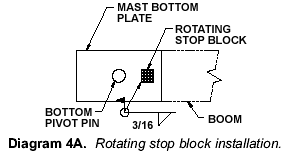
A)
Prior to mast installation: Locate rotating stop block. Weld
stop block to under side of mast bottom
plate using E70xx
electrodes, per AWS D1.1 specifications
(diagram 4A). |
|
|
|
|
B)
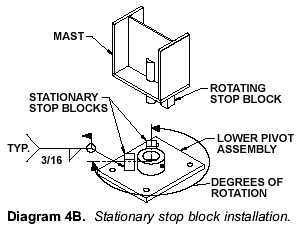
Swing boom to the farthest position of use in one direction.
C) Place stationary stop block on lower pivot assembly against
the rotating stop block. |
|
|
|
|
|
|
|
|
|
|
|
 |
|
D)
Weld stationary stop block to lower pivot assembly using
E70xx electrodes, per AWS D1.1 specifications
(diagram 4B).
E) Repeat Steps A-D for opposite direction.
F) Touch up with paint provided. |
|
|
|
|
| 4.2
Bottom Entry Collector |
|
|
|
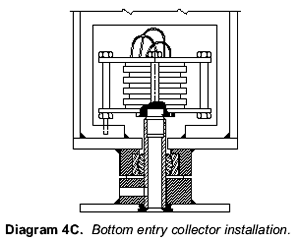
A)
Connect wires through the pivot pin to the collector wires
(diagram 4C).
B) Place connector over the top of the pivot pin making sure
the
connected wires are pushed down inside
the pivot pin. |
|
|
|
C)
Lock the connector in place by tightening the set screws at
the
base of the collector.
D) Connect the collector to the stabilizer bolt mounted in the
mast
assembly.
E) Add appropriate size hole in the collector cover to allow
installation of hoist power cable to
collector.
F) Attach collector cover with mounting hardware provided. |
|
|
|
|
|
|
|
|
|
 |
|
|
|
Other
Options
• Flat Wire Conductor Cable
• Flat Wire Cord Grip Connectors
• Wire Rope Trolleys for Flat or Round Cable
• Fusible Disconnect Switch
• Powered Rotation |
|
|
|
|
|
Mast Type Jib
Cranes, Cranes, Articulating Jib Cranes, Gorbel Jib Cranes,
Jib Cranes, Floor Mounted Jib Cranes,
Gorbel Cranes, Hoist, and Jib Booms from your source for material
handling equipment.
|
Back to Product Page
|
| HOME /
ORDER / SEARCH
/
QUOTE /
CONTACT US / ABOUT
US /
MY ACCOUNT/
SHOPPING CART |
|


